Copyright 2012-2013 - "Be The One" - www.aclassofone.blogspot.com All rights are reserved. No text, photos, or content may be reproduced without direct permission from the author.
That's a funny name! That was one of the first statements my 8 year old daughter made when we first received and opened our package of materials. The name comes from the concept of taking flash cards with pictures on one side and Spanish words on the other, and 'flipping them over' and 'flopping them down' to make short sentences. This is a very kid-friendly curriculum. The flash cards have colorful pictures of children, animals, and everyday objects.
The package is here...let's open it! When we opened up our box, we found a manual that contained 150 pages worth of Spanish lessons. The papers were already hole-punched, and ready to place in a binder. There was also a nice printed cardstock to slip into the front, side, and back of a clear cover binder. The curriculum also contains a white dry erase paddleboard to use in the lessons, a marker, three sets (135 total) of sturdy, colorful flashcards, each containing a word or phrase, 4 CD's that contain audio lessons, and 2 clear card holder pages to use for sentence building.
We set up our binder right away!
How do lessons work? The curriculum is set up to do Spanish lessons three times a week. On the first day, the parent/teacher selects the particular flashcards that are assigned to that lesson, sets them out, and plays the audio lesson on the CD. Lessons take about 10 minutes, maybe a little more or less depending on student interest and how much you review the flashcards. The second and third days utilize the same set of flashcards, and transition from interacting with the audio CD lesson to the parent/teacher pronouncing the words and giving the commands. The lessons seem very flexible. If the student needs more of a challenge, you can certainly do more, but we found that the lessons seem to be just about right for my third grade Spanish student! Some days we did end up playing games with the flashcards longer though. Regular review and breaks are built into the schedule, and if you learn at the suggested pace, the entire curriculum would take about two years, or four semesters to complete.
What makes this curriculum different? While there is some writing and "book learning" available as part of the lessons, the main thrust of the curriculum is for the student to learn the language by using it. Common words and simple phrases are learned and used immediately. For my "hands on" learner, it made remembering the words from lesson to lesson much easier! While learning words and building sentences, students are actually learning Spanish grammar....nouns, verbs, adjectives, etc. It reminds me A LOT of the way a toddler learns to speak their own native language! Perhaps this is one reason why this curriculum seems to be so successful - because it is a very natural way to learn language - by actually using it!
About those flash cards: The cards not only have the Spanish and English words on the back, but they also have the Spanish pronunciation. This was very helpful to me as a teacher. While I am 'familiar' with Spanish, I do not speak it fluently, yet I found plenty of 'helps' like this built into the program, so that I could still teach a beginner level Spanish to my daughter even though I am not an expert.
Here is the card combination that became Kelly's favorite Spanish statement to 'practice' on me!
Building sentences: If you would have told me that my 8 year old would be speaking full, grammatically correct sentences in Spanish after only 2 weeks of this curriculum, I probably would have laughed. The way these lessons are set up though, it really was true! And amazing! By learning simple words and putting them together properly, Flip Flop Spanish makes it easy to quickly start speaking in complete sentences.
My favorite thing about this curriculum: It has to be how easy it was to jump right in and start! There was not tons of pages of 'teacher material' to read, or lessons to plan out. There wasn't even a bunch of pages to download and print, or worksheets to copy. Within ten minutes of opening the package, we had already embarked on our first lesson! The written lessons are nearly a word-for-word transcript of the audio CD, which made it extremely easy for us to not only repeat sections that needed extra practice, but also for me to be able to participate in the instruction end of the lessons. Some days, rather than listening to the CD, I read the lesson instead. My daughter enjoyed that very much!
Two suggestions for improvement: Honestly, I had to look hard to find anything that I would improve on in this curriculum. If I could change anything, it would be to add in blank, ready-to-write flashcards for the words that we have to add in. For example, in the picture above, I had to make a flashcard for the word "and". There are several similar words that you must make your own card for. It would be nice if there were an extra 20 cards or so included in the pack that were blank, and could be used for the "make your own" words. That way they would be similar in size and appearance to the rest of the cards. We just used 3x5 cards cut in half for ours. The other thing that didn't really work for us was the clear pocket holder for the flash cards. It is similar to a business card holder that you would use in a 3 ring binder. It is supposed to be used as a 'sentence builder' where you can make your sentences by slipping the appropriate flash cards into the slots, and then reading them. My daughter preferred to have the cards laid out in a long line, or strip, on the table. Instead of using it as a sentence builder, I ended up using the clear holder to store the cards for the current week's lesson so I did not have to search for them in the pile every time I sat down to use them.
There was no place to store the flashcards in the binder. My suggestion would be to buy a zippered pouch, or pencil holder, that could clip in to the 3 ring binder and hold the flashcards, keeping everything together.
Who is this curriculum for? Well, the author recommends it for ages 3-93. I guess that just about covers everyone! I think it would be very easy to use this as a starting curriculum for a preschooler. My 8 year old thrived on it. It also attracted the attention of my high schooler who has 2+ years of Spanish instruction. My 8 year old loved the "Pictionary" and other games associated with using the cards and the dry erase board. She enjoyed the interaction with other family members who would participate in using the cards with her. This is an attractive curriculum that is easy to use for all ages.
How much does it cost? At the time of this review, the curriculum package is available on the website for $99.95 with free shipping. This gives two years of Spanish lessons, which can be used by an entire family with multiple ages. There are some additional items that can also be purchased, such as an iphone app,a workbook,a notepad, and some teacher tools.
The bottom line: I think this curriculum is well thought out, and very well set up, and I highly recommend it for any family looking to gain a good working knowledge and use of Spanish. I think it works very well alongside other curriculums as well.
To see what other Crew members thought of Flip Flop Spanish, click the banner below:
Copyright 2012-2013 - "Be The One" - www.aclassofone.blogspot.com All rights are reserved. No text, photos, or content may be reproduced without direct permission from the author.
Pears from the backyard tree! Hopefully they will be pear sauce by this time tomorrow.....
Copyright 2012-2013 - "Be The One" - www.aclassofone.blogspot.com All rights are reserved. No text, photos, or content may be reproduced without direct permission from the author.
While learning about DNA we found a very interesting project complete with free downloadable pdf's that had instructions and age-appropriate instruction about DNA. It was very easy to understand.
After downloading and reading the material, we set out to build a model DNA strand. Melissa enjoyed twisting it into a double helix formation. In fact, I think she thought it was pretty neat that she could say double helix and actually know what it meant enough to explain it!
This one didn't seem as scientific I guess, because she had no problem at all with eating this project once it was complete!!
After reading through the materials and discussing DNA, we assembled supplies. While the project calls for 4 shades of colored marshmallows, we ended up substituting gumdrops, because that was much easier to find in the store.
We followed the given sequence:
Sequence 2: T G G T T T A G A A T T
This demonstrated that DNA chemical bases always follow a distinct pattern.
Melissa was amazed at how orderly DNA is, and how big it is too! There is a lot of DNA packed into a very small area of cells. Another thing that really struck her was how quickly it can copy itself.
Once again, you can visit the Genetics site of the University of Utah for a free DNA lesson as well as printouts for this project, by clicking here: Have Your DNA and Eat It Too
Copyright 2012-2013 - "Be The One" - www.aclassofone.blogspot.com All rights are reserved. No text, photos, or content may be reproduced without direct permission from the author.
We have been really enjoying the Apologia Science Curriculum. Melissa has grasped so much of the material using the 'hands on' approach.
Here is an edible cell that she made to demonstrate all the organelles that are in a cell.
We started off with a pile of candy.....
We used the following candies to represent various organelles:
jelly beans for mitochondria (of course we had to have more than one!)
Skittles for lysosomes
Smarties made up a Golgi body
Fruit Roll Up cut into the shape of an endoplasmic reticulum
Plenty of Nerds ribosomes
Twizzler Pull and Peels for centrioles
A large fireball for the nucleus
The cytoplasm, or cell body - the free flowing gel-like substance that the organelles move through, was made of yellow jello mixed with Knox gelatin to toughen it up.
After mixing the jello up, spraying a bowl with Canola spray, and placing the jello mix in it, we allowed the jello to harden. Melissa prepared all her 'organelles', and told me about each one and what it's purpose in the cell is. When the jello was firm, she added all her candy pieces and turned the jello out onto a plate.
Here's a closeup of our cell.
You can see the nucleus very well in this picture:
Here is a picture of the finished project.
What did Melissa learn from this? Not only did she learn the various functions of cells, but the biggest thing she took away from this project, and wrote about in her journal, was that she was amazed how many different things are packed into a cell, and how much work they accomplish. There is a lot going on that we cannot even see!
The funny thing....after using all this candy in such a scientific way, to build a cell....Melissa had no interest in actually eating her cell!
Copyright 2012-2013 - "Be The One" - www.aclassofone.blogspot.com All rights are reserved. No text, photos, or content may be reproduced without direct permission from the author.
Copyright 2012-2013 - "Be The One" - www.aclassofone.blogspot.com All rights are reserved. No text, photos, or content may be reproduced without direct permission from the author.
Since my childhood I have always had a deep interest in all things political. I have distinct memories of certain political events from growing up - everything from my marching band in school playing for a presidential candidate to voting in my first election at age 18. As I get older and busier, I try to stay informed on current political events as much as possible, and have tried to cultivate this same interest in my children. I firmly believe in the power and importance of being involved in our American political process to the best of our ability! When our family had the opportunity to review The Presidential Gamethrough The Old Schoolhouse Review CrewI was excited because I suspected this game would not only be fun to play, but would really help the children understand the somewhat daunting electoral process of electing an American president! I was not disappointed!
The Presidential Gameis a board game complete with 2 sets of dice (red and blue), red and blue chips to mark electoral votes, as well as "politics" cards (which include extra opportunities to gain/lose chips), and a scoring pad to keep track of votes. The board itself is an electoral map of the entire United States, with the current number of electoral votes those states hold.
Players join up to form two teams - the Republicans (red) and the Democrats (blue), and then begin the game. Each round of turns is equivalent to one 'week' on the campaign trail, and you can predetermine how long you would like your game to last by setting the number of 'weeks' or rounds that will be played. Chips mark the place of votes, and players put the number of chips they win on the states that they are fundraising or campaigning in. When they have reached the number of votes, or chips, needed to win that particular state, it is declared a red or blue state and the votes counted towards the 270 total votes needed to win the election. The instructions state that a full game is 30 weeks and should last about an hour. We found that it took us much longer - perhaps because the teams were slower in their decision making process of which states to campaign and fundraise in! Instructions are included to be able to complete a shorter version and still come up with a winner.
A bonus feature that comes with the game is access to an online interactive electoral map that looks just like the one shown on TV news networks during a presidential election. Instead of tallying votes by hand on the score pad, players can set up a tablet or laptop on the table while playing, and tally votes electronically in real time! As states are won by either party, the electronic map changes the color of the state to red or blue depending on which party won it, and also automatically tallies the votes at the top of the screen. As you well know, the first party to reach 270 electoral votes wins the game and the election!
Here is a screen shot of one of our electoral maps from the online interactive WebMap Calculator:
How we used this game: We divided our family up into teams, and used this game for "Family Game Night". It was a blast! We had so much fun with it. We decided that we really like the online WebMap Calculator to tally votes and keep track of what week of play we are on. The children enjoyed watching the states change color on the screen. There was also some 'stealing' of states going on, as the children got more savvy with their campaigning strategies. It was really amazing how close the races were - very similar to real life. The children enjoyed modeling their decision making after recent presidential elections that we have discussed. One team was strong on fundraising and trying to win the 'big' states, and the other team focused on campaigning and quickly picking up all the 'little' states. The races were very, very close, and often came down to just one state being the deciding factor, much like it has been in the past three presidential elections!
Lessons learned from this game: In the game, fundraising is only allowed in four key states: California, New York, Texas, and Florida. The children were really able to grasp the concept of why presidential candidates spend so much time in those states. There was much campaigning in states where more electoral votes were at stake, much like the real life process. It was easy to see why small states don't seem to matter as much to spend time campaigning in, when they only have 3 votes to pick up, as opposed to the larger states where 10 or more might be at stake. Another key concept that was much more easily understood is the electoral college process, where the winner takes all the votes of the state. I know many adults who still do not understand this, and think that the popular vote is what elects a president!
The Bottom Line: In playing this game, I feel my children have received a greater understanding of the process of electing an American president. This game is an amazing way to learn about American politics in a fun setting.
Who is this game for? The recommended ages for this game are 11+. I think that is probably right on. While my 8 year old did participate in our family game night, I am not sure she totally grasped the concepts of the game, like my teens did. Adults would very much enjoy and appreciate this game as well, especially if they enjoy politics.
How much does it cost? The Presidential Game can be purchased here for $35. plus shipping. When you purchase the game, a code is included to give you free access to the online WebMap Caluculator.
Some more extras: While instructions are included in the game, there are a few things that are not real clear, and the website has instructions to downloadas well as answers to frequently asked questions that are helpful when first learning how to play. There is also a Youtube summary of the game here:
I wholeheartedly recommend this game to any family who enjoys playing games together, but especially to those who enjoy politics and would like to compete to win the presidency! While the game can be played by only two players, it is much more fun to play as teams.
If you would like to read the opinions of other families from The Old Schoolhouse Review Crew who have also been trying out this game, please click the banner below.
Copyright 2012-2013 - "Be The One" - www.aclassofone.blogspot.com All rights are reserved. No text, photos, or content may be reproduced without direct permission from the author.
This school year we are studying "Exploring Creation With Anatomy and Physiology". I will be posting a series of helps to accompany and expand on each unit, and will gather and list the entire series of posts on my "Apologia Page". (To access the list of links, click the tab just below the header at the top of the blog).
Unit One is an in-depth study of cells.
Here are four short videos to illustrate the function of the organelles in the cells.
We found these videos fascinating, and a great help to understanding how cells function. I hope you will find them helpful as well!
Copyright 2012-2013 - "Be The One" - www.aclassofone.blogspot.com All rights are reserved. No text, photos, or content may be reproduced without direct permission from the author.
So...this is my last post on the "blogging through the alphabet" journey I started last spring. It's been a lot of fun, and I hope you have found the posts meaningful and enjoyable.
For my 'Z' post I would like to write about a book (and movie) that my girls have really enjoyed.
Z is for Zipporah Feldman
Dear America: Dreams in the Golden Country
"Dreams in the Golden Country" is an historical fiction book in the "Dear America" series. It is written for the middle school/junior high level (grades 6-8) but all the girls enjoyed reading it. There is also an accompanying VHS movie that our library has, that we have watched over and over!
In this story, "Zippy" is a young lady whose Jewish family immigrates to America from Russia in the early 1900's. They join a thriving immigrant community in New York City, and learn the new ways of America while trying to hang on to some of the traditions of the old country. They must start at the very bottom, learning English and earning their way. My children laughed and cried over the real life stories that were made so real, including love, death, and tragedy. The Jewish customs are explained carefully and respectfully, so that we got a true sense of how life really was for this family. While they are a fictitious family, the details of the book are based on true historical facts.
While we have enjoyed most of the books in the "Dear America" series, this one is our family favorite.
**This post does contain an affiliate link to Amazon. Purchasing through this link helps support our blogging efforts! Thanks!**
Copyright 2012-2013 - "Be The One" - www.aclassofone.blogspot.com All rights are reserved. No text, photos, or content may be reproduced without direct permission from the author.
Top and bottom view of a lovely heart shaped tomato!
Copyright 2012-2013 - "Be The One" - www.aclassofone.blogspot.com All rights are reserved. No text, photos, or content may be reproduced without direct permission from the author.
Copyright 2012-2013 - "Be The One" - www.aclassofone.blogspot.com All rights are reserved. No text, photos, or content may be reproduced without direct permission from the author.
In the past, I have had the opportunity to learn about the four distinct personality styles, and combinations of such, that make up our character. I find it fascinating to know that I have four children, and all of them are so different personality-wise. It takes a lot of prayer and wisdom for me, as a mom, to deal with each of them in an effective way, taking into account their personality strengths and weaknesses, and how they will respond to communication, correction, and instruction.
When I was given the opportunity to review the StudentKeys Online Personality Style Report from PeopleKeys, I was very intrigued. This is the first time I have heard of this company, and I was very interested to read their history and the theory behind their behavioral assessment.
PeopleKeys uses the same four basic behavioral traits that I have previously learned about, and breaks them down into a simple and understandable list, called DISC.
D - Drive
I - Influence
S - Steadiness
C - Compliance
The material that this company produces also takes into account that most people do not fit neatly into one of the four personality types, but rather are a combination of at least two.
While PeopleKeys has a number of resources for the business world, including personality tests for hiring, communication skills, and team building, I am most interested in their student assessments and learning how to best enrich the relationship I have as a mother and teacher to my children. That's what I will be focusing on for this review.
Here is a video overview of the report that I reviewed:
While PeopleKeys does have a Complete Student Binder that sells for $49 and contains all the student tests that are available, parents and teachers can also select individual workbooks and tests that are particularly suited to the area that you will find most helpful. There is also an extensive selection of online products available that allow you to have your student complete the test online, have it automatically scored, and then download a completed report of the evaluation.
What we received for this review: We received one online personality assessment: the Student Personality Style Report. Normally, this report sells for $12.00. It can be purchased in bulk for school or classroom use, at a discount up to 50% off, if 50 or more individual tests are purchased.
How we used this: I chose to do this online personality style report with Melissa, my (almost) 12 year old. The suggested age for this tool is age 13 through adult. I knew Melissa was on the young end of this, but decided to proceed because she was the child I was most interested in gaining more insight to her behavior patterns.
When we logged on to the online questionnaire, we found a colorful welcoming page. Melissa was excited to be chosen as the only one in the family who got to do a special computer project with Mom, and was keen on being able to click and answer all the questions.
There were three pages of questions that looked similar to this screen shot:
When Melissa was finished with all three pages of questions, a page came up that told us that she had successfully completed the online assessment, and there was a link to download the completed report:
What was the test like? The information said that the test would take about 10-15 minutes. It took Melissa 45 minutes. I am not really sure that it could be done in 10-15 minutes. The questions are ones that really make you think. In most scenarios, you have to answer a question by ranking four character traits in order to how you would respond to a particular scenario. There is instant feedback if you mark the same number twice, and you also have the option of saving your work and returning to it at a later time. Since Melissa wanted to complete it all in one sitting, we persevered through it. Most of the questions she was able to answer completely on her own. A few of them required a little extra explanation from me, mostly just explaining what was meant by particular wording. I was glad to sit by Melissa and do some extra explaining, because I knew that she was a little young for the testing, and also it gave me some fascinating insight into some of her thinking processes! I explained that this was a "fun" set of questions (I never called it a test) and I told her that there were NO wrong answers, in order to alleviate any 'test stress'.
What happened after the test was done? I got an instant report of her personality analysis! It came as a PDF file that I could save and print from my computer. I have completed similar personality tests before, and absolutely hated having to tediously grade every question and chart the answers, so having the online option of instant results with no effort on my part was excellent!
What was the report like? The report for the "Student Personality Style" is 34 pages long! It begins with an introduction to the personality styles, explaining why it is important to understand and what each type of personality is. I found this short and simple explanation very thorough and helpful. Often this type of information can get bogged down with wordiness and language that is over my head, so I appreciated the simple explanations in everyday language.
From the report, here is a list of reasons why it would be important to understand your personality style (or your child's, if you are a parent or teacher):
It helps you become a better communicator, and recognize and adapt when working with different personality styles.
It helps you resolve or even prevent conflicts by being aware of the other person's motivation and adjust your own expectations.
It helps you to appreciate the differences in others, rather than being frustrated by them.
It helps you gain credibility and positively influence others.
Next there was a section that identified Melissa's personality style (She is a "persuader"). This page listed her most distinct emotions, what types of action she brings to a team, and what her greatest fears are. It explains how she motivates others, how she reads or evaluates others, how she goes about influencing others, how she responds to pressure, what areas she needs improvement in, and some greatest strengths and weaknesses.
According to the DISC graph, which comes next, Melissa is a primary "I" personality style, which means she is an "Influencer". It also explains how her answers to the test questions showed her other prevailing styles, creating a "style blend".
The remainder of the report is devoted to explaining the personality styles in greater detail. There is really nothing left to guesswork at all. This is one of the most concise, thorough, and detailed reports I have ever read on this subject!
Also included in the report is information and personal development questions pertaining to thinking and learning styles. There are worksheets to help the tester learn more about themselves, and learn more about recognizing behavior patterns and cues from those around them.
Final thoughts: I have learned so much about Melissa's style and behavior pattern from reading this. It has been very enlightening! When I printed out the report, I was reading it to the family, and all of us were awestruck by how "spot-on" the assessment was of Melissa's personality. It was great to read positive evaluation of how helpful her character traits can be, and what situations they are best suited for. I think it will really help me as a mom to understand her better, and develop schoolwork and situations that will allow her to be the most effective. I also like having her weaknesses on paper, as it will be a good reminder to read and pray over, and to help Melissa overcome challenges she will face in life as a result of how she reads situations and responds to them. Overall, I think this evaluation was extremely helpful! I would highly recommend it to parents and teachers who would like to have a better working knowledge of their students, and be more effective in their relationships.
We would also like to try: Of course, the other teens in the family now want to complete a personality style assessment of their own, and I would like to read the results of theirs as well, so we will be ordering each their own test in the near future. Laura would also like to complete the Career Style Report to gain some insight into what types of studies she would like to pursue after high school. There is also a Children's Workbook that I am considering for Kelly, as well as an entire faith based series to be used in ministry settings that looks very interesting.
The Old Schoolhouse Review Crew reviewed a number of various products from PeopleKeys.If you would like to read about some of their other products, please click the banner below!
Copyright 2012-2013 - "Be The One" - www.aclassofone.blogspot.com All rights are reserved. No text, photos, or content may be reproduced without direct permission from the author.
Psalm 139:14: "I will praise thee; for I am fearfully and wonderfully made: marvellous are thy works; and that my soul knoweth right well."
Copyright 2012-2013 - "Be The One" - www.aclassofone.blogspot.com All rights are reserved. No text, photos, or content may be reproduced without direct permission from the author.
Supplies: All you need is a piece of colored paper, a pencil, a push pin, and a small cardboard box to use as a work surface.
Directions: Have your child lightly sketch a simple design on the piece of colored paper. Taking the cardboard box, turn it over and use the bottom as a work surface. Place the paper on the box. Using the push pin, begin making small pin prick holes along the penciled lines.
The pricks should be far enough apart that there are distinct holes, but close enough together that it gives the illusion of a continuous line.
When all the pencil lines have been pricked, hold your creation up to the sunlight and enjoy seeing your design "light up" with sunshine!
Some ideas for simple outlines:
leaf
smiley face
stick figure family
flower
butterfly
boat
snowman
constellations (works great on black paper - use chalk to write constellation names next to your creation)
house
Some ideas for more elaborate outlines:
city skyline (looks really cool on black paper)
skyscraper
animals
person silhouette (especially side profile of the head)
automobiles
Copyright 2012-2013 - "Be The One" - www.aclassofone.blogspot.com All rights are reserved. No text, photos, or content may be reproduced without direct permission from the author.
Copyright 2012-2013 - "Be The One" - www.aclassofone.blogspot.com All rights are reserved. No text, photos, or content may be reproduced without direct permission from the author.


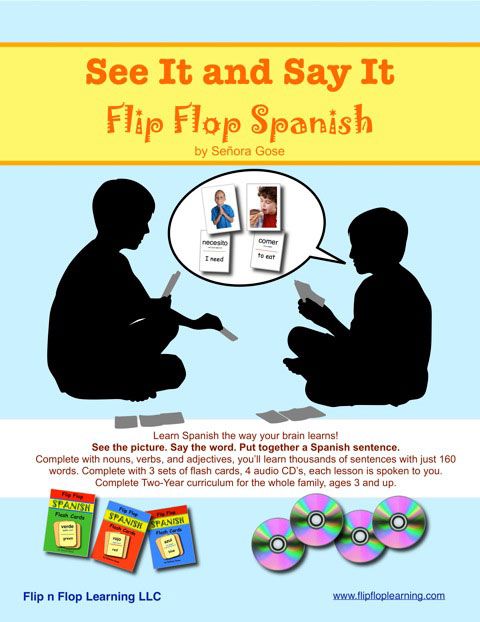 That's a funny name! That was one of the first statements my 8 year old daughter made when we first received and opened our package of materials. The name comes from the concept of taking flash cards with pictures on one side and Spanish words on the other, and 'flipping them over' and 'flopping them down' to make short sentences. This is a very kid-friendly curriculum. The flash cards have colorful pictures of children, animals, and everyday objects.


 Since my childhood I have always had a deep interest in all things political. I have distinct memories of certain political events from growing up - everything from my marching band in school playing for a presidential candidate to voting in my first election at age 18. As I get older and busier, I try to stay informed on current political events as much as possible, and have tried to cultivate this same interest in my children. I firmly believe in the power and importance of being involved in our American political process to the best of our ability! When our family had the opportunity to review The Presidential Game through The Old Schoolhouse Review Crew I was excited because I suspected this game would not only be fun to play, but would really help the children understand the somewhat daunting electoral process of electing an American president! I was not disappointed!
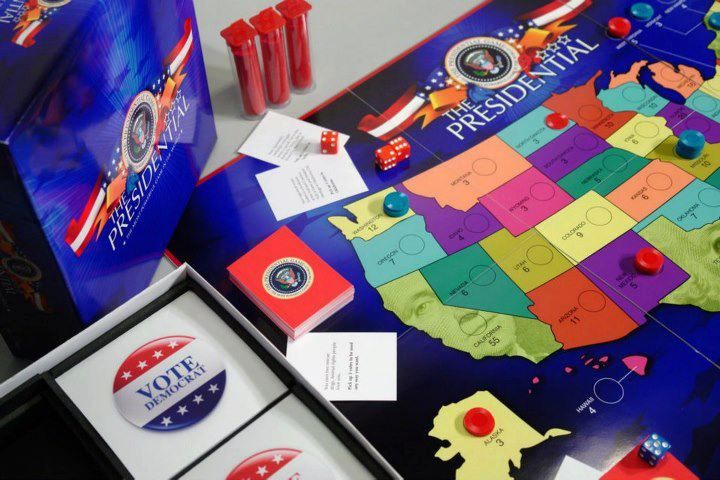


 What we received for this review: We received one online personality assessment: the Student Personality Style Report. Normally, this report sells for $12.00. It can be purchased in bulk for school or classroom use, at a discount up to 50% off, if 50 or more individual tests are purchased.


